
When you search online in Kannada, you will notice that many topics still do not have enough detailed and high quality content. At the same time, more people are choosing to read information in their own language, creating strong opportunities for new Kannada bloggers.
This demand can be seen across topics such as technology, education, jobs, finance, health, and business. Many regional language websites have grown by consistently publishing useful content that answers real questions and helps readers solve everyday problems.
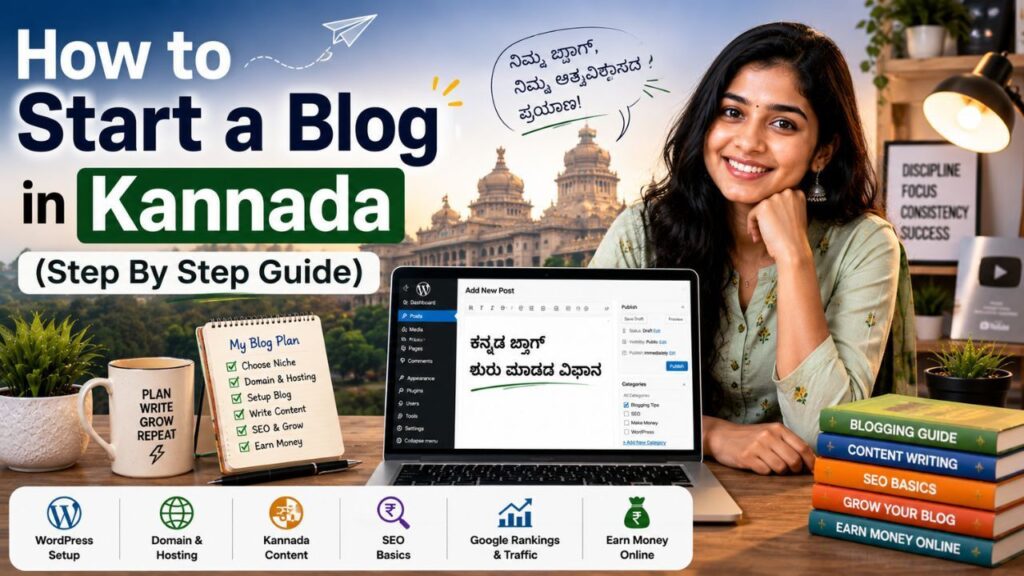
Building a Kannada blog is much easier than most beginners expect. With the right niche, a domain name, reliable hosting, and a clear content strategy, you can create a blog that attracts readers, builds authority, and creates long term growth opportunities. The sections below explain each step in a simple and practical way.
Why You Should Start a Blog in Kannada in 2026?
Regional language content continues to grow as internet users increasingly prefer consuming information in their native language. Kannada blogging is no longer limited to personal websites or hobbies. Today, it can help you build an audience, establish authority, and create multiple income opportunities.
More People Now Search Content in Kannada
People regularly search for information related to:
- Technology
- Education
- Government Schemes
- Jobs
- Health
- Finance
- Travel
- Food Recipes
- Online Earning
- Business Ideas
Many users prefer reading detailed information in Kannada rather than English, creating opportunities for bloggers who can provide useful and easy to understand content.
Less Competition Than Many English Niches
English blogging is highly competitive because thousands of websites target the same keywords. In many Kannada niches, high quality content is still limited, making it easier for new bloggers to establish authority and attract organic traffic.
Better Audience Trust and Engagement
People often spend more time reading content written in their own language. This can lead to:
- Better User Experience
- Higher Engagement
- More Repeat Visitors
- Stronger Audience Trust
- Improved Content Sharing
Growing Opportunities in Regional Language Blogging
As Kannada internet usage continues to increase, businesses are investing more in regional content marketing, sponsorships, and advertising. This creates additional opportunities for bloggers who build a loyal audience.
Multiple Income Opportunities
A Kannada blog can generate revenue through:
- Google AdSense
- Affiliate Marketing
- Sponsored Content
- Freelance Services
- Digital Products
- Online Courses
- Consulting
- YouTube Integration
Many successful bloggers combine multiple income sources instead of depending on a single monetization method.
What You Need to Start a Blog in Kannada
Many beginners assume blogging requires advanced technical knowledge. In reality, only a few basic requirements are needed to get started.
A Clear Blogging Goal
Before creating a blog, understand why you want to start one.
Your goal may be:
- Sharing Knowledge
- Building an Online Business
- Creating Passive Income
- Building Personal Authority
- Growing a Community
A clear goal helps you make better decisions as your blog grows.
A Specific Niche and Audience
Choosing a niche helps readers and search engines understand your website.
Popular Kannada blogging niches include:
- Technology
- Education
- Finance
- Health
- Food
- Travel
- Business
- Jobs and Careers
A focused niche often performs better than covering unrelated topics.
Kannada Typing Tools
Writing in Kannada is easier than many beginners think.
Popular options include:
- Google Input Tools
- Voice Typing
- Kannada Keyboard Apps
- Smartphone Keyboards
Choose the method that allows you to create content consistently.
Basic SEO Understanding
You do not need advanced SEO skills on day one, but understanding a few basics helps.
Learn about:
- Keywords
- Headings
- Meta Titles
- Meta Descriptions
- Internal Linking
- Image Optimization
These fundamentals can help improve your blog’s visibility in search results.
How to Start a Blog in Kannada (Step By Step Guide)
Starting a Kannada blog does not have to be complicated when you follow the right approach. From choosing a profitable niche and setting up your domain name to installing WordPress, creating content, and improving SEO, each step helps build a strong foundation for long term growth.
Step 1: Choose Your Kannada Blog Niche
Before purchasing a domain or hosting, decide what topic your website will focus on.
Many beginners publish content on completely unrelated topics. This often makes it harder for readers and search engines to understand the website.
A focused niche usually performs better over time.
Technology
Technology remains one of the most popular blogging categories.
Content ideas:
- Smartphone Reviews
- AI Tools
- Blogging Tips
- Web Hosting
- Software Reviews
Education
Educational content attracts students throughout the year.
Content ideas:
- Exam Preparation
- Study Tips
- Career Guidance
- Scholarships
- Online Learning
Finance
Finance blogs can attract highly targeted traffic.
Content ideas:
- Personal Finance
- Investments
- SIP Guides
- Banking
- Business Ideas
Health
Health content helps readers improve their daily lives.
Content ideas:
- Fitness
- Nutrition
- Wellness
- Healthy Habits
Food and Recipes
Food blogs continue to perform well because readers regularly search for recipes and cooking ideas.
Content ideas:
- Traditional Karnataka Recipes
- Festival Foods
- Healthy Meals
- Cooking Tips
Travel
Travel blogs can focus on Karnataka tourism and local attractions.
Content ideas:
- Travel Guides
- Tourist Places
- Budget Travel Tips
- Travel Experiences
Jobs and Careers
Career focused content remains popular among students and job seekers.
Content ideas:
- Job Updates
- Interview Tips
- Resume Guidance
- Government Jobs
Local Karnataka Topics
Many bloggers overlook local content opportunities.
Examples include:
- Karnataka Events
- Local Business Guides
- City Information
- Cultural Topics
Local content often attracts highly targeted visitors.
How to Choose the Right Niche
Do not choose a niche simply because someone else is making money from it.
Instead, choose a niche that matches:
- Your Interest
- Your Knowledge
- Audience Demand
- Long Term Content Opportunities
Consistency becomes much easier when you genuinely enjoy the topic.
Step 2: Research Kannada Keywords and Topics
After choosing a niche, the next step is finding topics people are already searching for. Keyword research helps you understand audience demand and create content that answers real questions.
Understanding Search Intent
Before creating content, understand what users actually want.
For example:
Search Query: Best Hosting for Beginners
Users may be looking for:
- Recommendations
- Pricing
- Features
- Pros and Cons
Matching user intent often improves engagement and rankings.
Use Google Autocomplete
Google itself is one of the best keyword research tools.
Start typing your topic into Google and review the suggestions. These are real searches made by users and often provide excellent content ideas.
Explore People Also Ask
Google’s “People Also Ask” section shows common questions related to a topic.
Examples:
- Can blogging make money?
- Which platform is best for beginners?
- How much does blogging cost?
- How long does it take to get traffic?
Each question can become a separate article or FAQ.
Check Related Searches
At the bottom of Google search results, you will find related searches.
These can help you discover:
- New Keywords
- Content Opportunities
- User Interests
Use Google Trends
Google Trends helps identify growing topics and seasonal trends.
Benefits include:
- Discovering Trending Topics
- Comparing Search Interest
- Understanding Regional Demand
Find Low Competition Keywords
Many beginners target broad keywords immediately.
Instead of targeting:
Blogging
Target:
- How to Start Blogging in Kannada
- Kannada Blogging Tips
- WordPress Guide in Kannada
Specific keywords often provide better ranking opportunities.
Build a Content Plan
Before publishing your first article, create a simple content roadmap.
Example: Pillar Article
- How to Start a Blog in Kannada
Supporting Articles
- Best Hosting for Kannada Bloggers
- WordPress Setup Guide
- SEO Basics
- Keyword Research Guide
- Blogging Mistakes to Avoid
- How to Make Money Blogging
This approach helps build topical authority and makes future content planning easier.
Choose How You Want to Create Your Blog
Before setting up your website, it is important to choose how you want to build it. Today, beginners have two popular options. You can either create a blog using WordPress manually or use an AI powered website builder that handles most of the setup for you.
Option 1: Create a Blog With WordPress
WordPress is the most popular blogging platform in the world and powers millions of websites. It gives you complete control over your website, content, design, and monetization options.
Benefits of Using WordPress
- Full Website Ownership
- Better SEO Control
- Thousands of Themes and Plugins
- Multiple Monetization Options
- Easy Scalability
- Large Community Support
WordPress is usually the best choice for bloggers who want long term growth and complete control over their website.
Option 2: Create a Blog With YouDesign AI
YouDesign AI is an AI powered WordPress website builder that helps beginners create a website without coding or complicated setup processes. Instead of building everything manually, AI helps generate your website structure, content, design, and pages.
What Is YouDesign AI?
YouDesign AI allows you to create a professional WordPress website by simply providing basic information about your website or business. The platform automatically generates important pages, layouts, and content, helping you launch faster.
Key Features of YouDesign AI
- AI Website Creation
- AI Content Writer
- Smart Image Library
- Ready to Use Templates
- Mobile Friendly Design
- Built In SEO Setup
- One Click Website Launch
Who Should Use YouDesign AI?
YouDesign AI can be useful for:
- Beginners
- Bloggers
- Freelancers
- Coaches
- Small Businesses
- Local Service Providers
- Portfolio Websites
If you want to launch a website quickly without spending time on design and setup, YouDesign AI can be a practical option.
WordPress vs YouDesign AI
| Feature | WordPress | YouDesign AI |
| Website Control | Full Control | Simplified Setup |
| Customization | Very High | Beginner Friendly |
| SEO Flexibility | Excellent | Good |
| Ease of Use | Moderate | Very Easy |
| Website Setup Time | Longer | Faster |
| Best For | Long Term Blogging | Quick Website Launch |
For most serious bloggers, WordPress remains the preferred choice because of its flexibility and growth potential. However, YouDesign AI can help beginners launch a professional website much faster.
Step 3: Get Your Domain Name and Hosting With YouStable
Once you have selected your blogging niche and planned your content, the next step is getting a domain name and reliable hosting. These two things form the foundation of your website. Without a domain and hosting, your blog cannot be accessed online.
What Is a Domain Name?
A domain name is the address people use to visit your website. Instead of remembering a long IP address, visitors simply type your domain name into their browser.
Examples:
- KannadaBlogGuide.com
- KarnatakaCareerHub.com
- SmartKannadaTips.com
A good domain name helps readers remember your website and strengthens your brand over time.
What Makes a Good Domain Name?
When choosing a domain name, keep it:
- Short and easy to type
- Easy to remember
- Relevant to your niche
- Easy to pronounce
- Brandable for long term growth
For example, SmartKannadaTips.com is much easier to remember than a long keyword stuffed domain name.
Common Domain Name Mistakes to Avoid
Many beginners choose domain names that are difficult to remember or type.
Avoid:
- Very long domain names
- Numbers and symbols
- Difficult spellings
- Multiple hyphens
- Keyword stuffing
Bad Example: best-kannada-blogging-guide-2026.com
Better Example: SmartKannadaTips.com
What Is Web Hosting?
Web hosting is the service that stores your website files, blog posts, images, databases, and settings. When someone visits your website, the hosting server delivers your content to their browser.
If the domain name is your website’s address, hosting is the place where your website actually lives.
Why Buy Domain and Hosting Together?
Many beginners purchase domains and hosting from different companies. While this works, managing everything in one place is usually easier.
Benefits include:
- Faster website setup
- Easier domain management
- Single support team
- Simplified renewals
- Better account management
Why Choose YouStable WordPress Hosting?
For beginners starting a Kannada blog, YouStable offers a beginner friendly WordPress hosting environment with features designed to improve speed, security, and website management.
One of the biggest advantages is that eligible annual hosting plans include a free domain for one year, which can reduce your initial blogging costs.
Key Features of YouStable WordPress Hosting
- Free Domain for 1 Year*
- One Click WordPress Installation
- Free SSL Certificate
- LiteSpeed Web Server
- NVMe SSD Storage
- AI Optimized Caching
- Free Off Site Backups
- Imunify360 Security Protection
- Auto Theme and Plugin Updates
- Free Website Migration
- 24/7 Customer Support
These features help beginners launch a professional blog without dealing with complex technical configurations.
Choose the Right Hosting Plan
YouStable offers multiple Indian WordPress hosting plans suitable for different website sizes.
| Plan | Best For |
| DaStart | Personal Blogs and New Websites |
| DaProfessional | Growing Blogs and Multiple Websites |
| DaElite | High Traffic Blogs and Larger Projects |
Most beginners can comfortably start with DaStart or DaProfessional and upgrade later when traffic increases.
How Much Does It Cost?
Current WordPress hosting plans start from approximately:
- DaStart – ₹59/month
- DaProfessional – ₹119/month
- DaElite – ₹219/month
Eligible annual plans also include a free domain for one year, helping reduce your initial setup expenses.
How to Buy a Domain and Hosting From YouStable
Step 1: Choose a Hosting Plan
Visit the WordPress Hosting page and select the plan that matches your blogging goals and expected website growth.
Step 2: Search for Your Domain Name
Use the domain search tool to check whether your preferred domain is available.
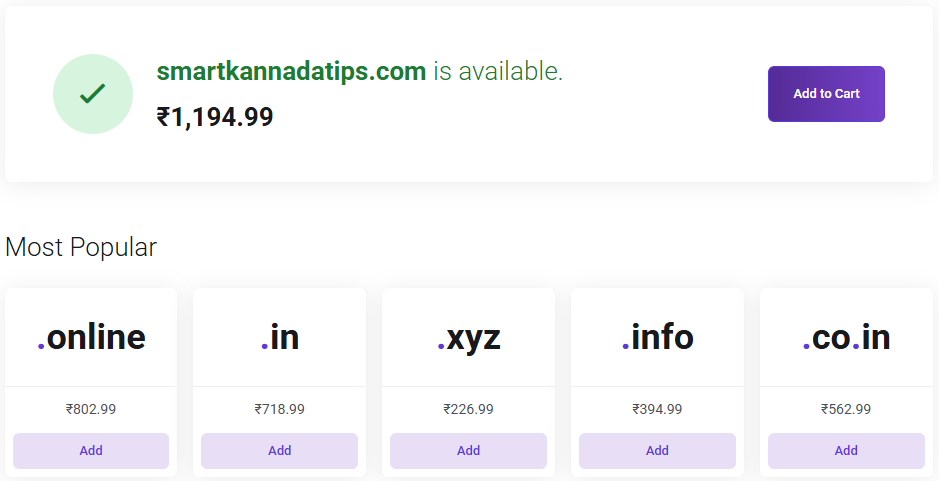
Examples:
- SmartKannadaTips.com
- KannadaCareerGuide.com
- KarnatakaBlogHub.com
Step 3: Claim Your Free Domain
If your hosting plan qualifies, you can claim your free domain during the checkout process.
Step 4: Create Your Hosting Account
Enter your:
- Name
- Email Address
- Phone Number
Make sure the information is accurate because important account details will be sent to your email address.
Step 5: Complete Payment
After completing payment, your hosting account becomes active. You will receive your hosting login details, domain information, and setup instructions, allowing you to move directly to the WordPress installation process.
Step 4: Install WordPress on Your Hosting
Your domain and hosting are now ready. The next step is installing WordPress, the platform that allows you to create blog posts, upload images, customize your website, and manage everything from a single dashboard.
Why WordPress Is Best for Kannada Blogging
WordPress is popular because it offers:
- Complete Website Ownership
- Better SEO Control
- Thousands of Themes
- Thousands of Plugins
- Multiple Monetization Options
It is also beginner friendly and does not require coding knowledge.
Install WordPress Using One Click Installer
Most hosting providers offer one click WordPress installation.
Log in to your hosting account, open the WordPress Installer, and click Install WordPress.
You will be asked for:
- Website Name
- Username
- Password
- Email Address
After entering the details, click Install.
Access Your WordPress Dashboard
Once installation is complete, visit: yourdomain.com/wp-admin
Enter your username and password to access the WordPress dashboard.
This dashboard becomes your website’s control center.
Configure Basic WordPress Settings
Before publishing content:
- Set your website title
- Select Asia/Kolkata time zone
- Change permalinks to Post Name
- Remove default posts and pages
These settings help keep your website clean and SEO-friendly.
Step 5: Choose a Lightweight WordPress Theme
Now that WordPress is installed, your website needs a design. A theme controls how your website looks and how visitors interact with your content.
Why Theme Selection Matters
Your theme directly affects:
- Website Speed
- User Experience
- Mobile Performance
- SEO
- Readability
A lightweight theme generally performs better than a heavy design focused theme.
Astra
Astra is one of the most popular WordPress themes.
Benefits:
- Fast Loading
- SEO Friendly
- Beginner Friendly
- Easy Customization
GeneratePress
GeneratePress focuses heavily on speed and performance.
Benefits:
- Lightweight Code
- Excellent Speed
- Flexible Design Options
Kadence
Kadence offers modern customization features while maintaining strong performance.
Benefits:
- Drag and Drop Controls
- Responsive Design
- Easy Setup
Blocksy
Blocksy is another lightweight theme suitable for bloggers.
Benefits:
- Fast Performance
- Modern Layouts
- Flexible Customization
How to Install a Theme
Inside WordPress: Appearance → Themes → Add New
Search for:
- Astra
- GeneratePress
- Kadence
- Blocksy
Click: Install → Activate
After activation, customize:
- Logo
- Colors
- Fonts
- Menus
- Header Layout
For most Kannada blogs, Astra or GeneratePress provide an excellent balance of speed, simplicity, and SEO performance.
Step 6: Create Essential Pages
Before publishing articles, create a few important pages. These pages help build trust, improve transparency, and make your website look more professional.
About Us Page
The About Us page explains who you are, what your blog covers, and why readers should trust your content. Many visitors check this page before following recommendations or subscribing to a website.
Contact Us Page
A Contact Us page allows readers, businesses, and potential partners to reach you easily.
Include:
- Contact Form
- Email Address
- Business Inquiry Information
Privacy Policy Page
A Privacy Policy explains how your website collects, stores, and uses visitor data. This page is important for user trust and advertising platforms.
Disclaimer Page
A Disclaimer helps explain content limitations and disclosures. This page is especially important for:
- Finance Blogs
- Health Blogs
- Affiliate Websites
Terms and Conditions Page
This page outlines the rules and conditions for using your website.
Editorial Policy Page
An Editorial Policy helps improve trust by explaining:
- How Content Is Created
- Fact Checking Process
- Content Updates
- Editorial Standards
As your blog grows, this page becomes increasingly valuable.
Step 7: Install Essential WordPress Plugins
Plugins add extra features to your website. Instead of installing dozens of plugins, start with only the essentials.
Rank Math SEO
SEO is important for helping your content appear in search results.
Rank Math helps optimize:
- SEO Titles
- Meta Descriptions
- XML Sitemaps
- Schema Markup
LiteSpeed Cache
Website speed affects both user experience and SEO.
LiteSpeed Cache helps:
- Improve Loading Speed
- Optimize Caching
- Improve Core Web Vitals
Wordfence Security
Security should never be ignored.
Wordfence helps protect your website from:
- Malware
- Brute Force Attacks
- Suspicious Login Attempts
UpdraftPlus Backup
Backups protect your website from unexpected issues.
Benefits include:
- Automatic Backups
- Easy Restoration
- Cloud Storage Integration
WPForms
Every professional website should provide a way for visitors to contact the owner.
WPForms helps create:
- Contact Forms
- Inquiry Forms
- Feedback Forms
Image Optimization Plugins
Large images can slow down a website.
Popular options include:
- ShortPixel
- Imagify
These tools reduce image sizes without significantly affecting quality.
Recommended Plugin Setup
For most Kannada blogs, these plugins are enough:
| Plugin | Purpose |
| Rank Math | SEO |
| LiteSpeed Cache | Speed |
| Wordfence | Security |
| UpdraftPlus | Backups |
| WPForms | Contact Forms |
Step 8: Set Up Kannada Typing
Your website is ready. Now it is time to create content in Kannada.
Fortunately, writing in Kannada is much easier than many beginners expect.
Google Input Tools
Google Input Tools remains one of the easiest ways to type in Kannada.
Example:
Typing:
Namaskara
can automatically convert into Kannada script using transliteration.
Voice Typing
Voice typing can significantly speed up content creation.
Benefits:
- Faster Writing
- Natural Language Flow
- Hands Free Input
Many bloggers use voice typing for first drafts.
Kannada Keyboard Apps
Several Kannada keyboard apps are available for Android and iPhone users.
These apps allow direct Kannada typing from mobile devices.
Smartphone Keyboards
Most smartphones already support Kannada language keyboards.
You can enable Kannada through your device settings and start typing immediately.
Tips for Faster Kannada Content Writing
- Write Naturally
- Create an Outline First
- Use Simple Language
- Focus on Helping Readers
- Publish Consistently
Consistency matters more than perfection.
Step 9: Publish Your First Kannada Blog Post
Many beginners spend too much time adjusting settings and never publish content. A blog grows through content, not endless customization.
Create a Reader Friendly Title
Your title should clearly explain what readers will learn.
Examples:
- How to Start Blogging in Kannada
- Best Smartphones Under ₹20,000
- Top AI Tools for Students
Clear titles improve both SEO and user experience.
Structure Your Article Properly
Use headings to organize content.
- H1 for Main Title
- H2 for Major Sections
- H3 for Subsections
A structured article is easier to read and understand.
Add Helpful Information
Focus on solving reader problems.
Include:
- Step-by-Step Instructions
- Practical Tips
- Examples
- Useful Recommendations
Helpful content usually performs better than generic content.
Add Images
Images improve readability and engagement.
Examples:
- Screenshots
- Tutorials
- Charts
- Infographics
Always use relevant visuals.
Add Internal Links
Internal links connect related articles.
Examples:
- SEO Guide
- Keyword Research Guide
- Hosting Guide
- Affiliate Marketing Guide
Benefits include:
- Better Navigation
- More Page Views
- Stronger Topical Authority
Optimize for Mobile Users
Most visitors now browse from smartphones.
Before publishing:
- Check Readability
- Test Images
- Review Layout
- Verify Loading Speed
Publish Your Article
Inside WordPress: Posts → Add New
Add:
- Title
- Content
- Images
- Categories
- Featured Image
Review everything and click Publish.
Congratulations. Your Kannada blog is now live.
Step 10: Submit Your Blog to Google Search Console
Publishing content is only the beginning. You also need to help Google discover your website.
Google Search Console is one of the most valuable free tools available for website owners.
Why Search Console Matters
Search Console helps you monitor:
- Indexed Pages
- Search Traffic
- Search Queries
- Technical Issues
- Website Performance
This data becomes extremely valuable as your blog grows.
Add Your Website
Open Google Search Console and click: Add Property
Enter your domain name.
Example:
yourdomain.com
Verify Ownership
Google provides several verification methods:
- DNS Record
- HTML File Upload
- HTML Tag
- Analytics Integration
Follow the method that works best for you.
Submit Your XML Sitemap
A sitemap helps Google discover your pages faster.
Most SEO plugins automatically generate one.
Example:
yourdomain.com/sitemap.xml
Inside Search Console:
Sitemaps → Add Sitemap → Submit
Request Indexing
After publishing important pages or articles:
- Open URL Inspection Tool
- Paste Your URL
- Click Request Indexing
This encourages Google to review the page sooner.
Important Reports to Monitor
Review these reports regularly:
- Clicks
- Impressions
- Indexed Pages
- Search Queries
- Coverage Issues
- Top Performing Content
Monitoring this data helps you identify opportunities to improve traffic and rankings.
Best Platform to Start a Kannada Blog
Before launching your blog, it is important to choose the right platform. The platform you select can affect your website’s flexibility, SEO performance, customization options, and monetization opportunities.
- WordPress
WordPress is the most popular blogging platform because it provides complete control over your website. It supports thousands of themes, plugins, and SEO tools, making it ideal for long-term blogging.
- YouDesign AI
YouDesign AI helps beginners create a professional WordPress website using artificial intelligence. It can generate layouts, content, images, and website sections automatically, making website creation much faster.
- Blogger
Blogger is a free platform owned by Google. It is suitable for learning blogging basics, but it offers fewer customization and monetization options than WordPress.
- Medium
Medium allows writers to publish content quickly without managing a website. However, you have limited branding control and do not fully own the platform.
Which Platform Is Best for Beginners?
If your goal is building a long-term blog, attracting search traffic, and creating income opportunities, WordPress is usually the best choice. If you want the fastest setup experience, YouDesign AI can help launch a professional website with minimal effort.
How to Write SEO Friendly Content for a Kannada Blog
Publishing articles regularly is important, but creating content that answers reader questions effectively is even more important. Search engines prioritize useful, relevant, and trustworthy content.
Find Topics People Already Search For
Instead of writing random articles, focus on topics that already have search demand.
Useful sources include:
- Google Autocomplete
- People Also Ask
- Related Searches
- Google Trends
- Search Console Data
Choose a Primary Keyword
Every article should focus on one primary keyword.
Example:
Primary Keyword:
- How to Start a Blog in Kannada
Supporting Keywords:
- Kannada Blogging Guide
- Blogging Tips in Kannada
- Kannada SEO Guide
This helps search engines understand the article’s main topic.
Create an Outline Before Writing
Creating an outline before writing helps organize ideas and improves readability.
A simple structure:
- Introduction
- Main Sections
- Supporting Sections
- FAQs
- Conclusion
Write Helpful and Original Content
Focus on solving reader problems rather than increasing word count unnecessarily.
Include:
- Practical Advice
- Real Examples
- Clear Explanations
- Actionable Steps
Optimize Important SEO Elements
Before publishing, review:
- SEO Title
- URL
- Meta Description
- Headings
- Images
- Internal Links
Small SEO improvements can make a significant difference over time.
Use Internal Linking
Internal links connect related content.
Examples:
- SEO Guide
- Hosting Guide
- Keyword Research Guide
- Affiliate Marketing Guide
This helps both readers and search engines discover additional content.
Optimize Images
Before uploading images:
- Compress File Sizes
- Use Descriptive File Names
- Add Alt Text
- Use WebP Format When Possible
Optimized images improve loading speed and user experience.
Add FAQs
FAQ sections help answer additional user questions and improve content completeness.
Update Content Regularly
As information changes, update:
- Statistics
- Screenshots
- Links
- Examples
- Recommendations
Fresh content often performs better than outdated content.
How to Rank Your Kannada Blog on Google
Ranking on Google requires consistency, quality content, and a good user experience. There are no shortcuts, but following proven practices can improve your chances of success.
Understand Search Intent
Before writing, ask what the user expects to find.
For example:
Search:
Best Hosting for Beginners
Users usually expect:
- Recommendations
- Pricing
- Features
- Pros and Cons
Content that matches user intent often performs better.
Build Topic Clusters
Instead of publishing unrelated articles, create connected content around a central topic.
Example:
Main Topic:
- Blogging Guide
Supporting Topics:
- SEO Guide
- Hosting Guide
- Keyword Research Guide
- Content Writing Guide
This helps build topical authority.
Improve Internal Linking
Internal linking helps:
- Search Engines Understand Content Relationships
- Visitors Discover More Content
- Increase Page Views
Focus on Website Performance
Improve performance by:
- Using LiteSpeed Cache
- Compressing Images
- Choosing Lightweight Themes
- Avoiding Unnecessary Plugins
Fast websites generally provide a better user experience.
Build Trust Signals
Trust is important for both users and search engines.
Include:
- Author Information
- About Us Page
- Contact Page
- Privacy Policy
- Editorial Policy
Earn Quality Backlinks
Backlinks remain an important ranking factor.
Ways to earn backlinks:
- Publish Useful Guides
- Share Original Research
- Create Helpful Resources
- Collaborate With Other Creators
Monitor Performance
Use:
- Google Search Console
- Google Analytics
Track:
- Traffic
- Clicks
- Impressions
- Rankings
- Top Pages
Regular analysis helps identify opportunities for improvement.
Common Blogging Mistakes New Kannada Bloggers Make
Many beginners make mistakes that slow down their progress. Avoiding these mistakes can help your blog grow more effectively.
- Choosing Too Many Topics: Publishing content on unrelated topics can confuse readers and search engines. Focus on one niche whenever possible.
- Ignoring SEO: Without basic SEO, even high quality content can struggle to attract traffic.
- Publishing Inconsistently: Blogs often grow through consistency. Publishing regularly helps build authority and trust.
- Copying Content: Always create original content. Copying content can harm credibility and search visibility.
- Expecting Fast Results: Blogging is a long term process. Most successful blogs take months to build traffic and authority.
- Choosing Poor Hosting: Slow hosting can negatively affect website speed and user experience.
How Long Does It Take for a Kannada Blog to Grow?
Growing a blog takes time, consistency, and quality content. Results vary depending on your niche, content quality, competition, and publishing frequency.
First 3 Months
Focus on:
- Publishing Content
- Learning SEO
- Building Website Structure
Traffic may be limited during this stage.
3 to 6 Months
You may start seeing:
- More Indexed Pages
- Increased Impressions
- Initial Organic Traffic
6 to 12 Months
Many blogs begin gaining noticeable traffic and ranking improvements during this period.
After 12 Months
Blogs that consistently publish useful content often experience stronger growth, increased authority, and better monetization opportunities.
7 Ways to Make Money From a Kannada Blog
A Kannada blog can become more than just a platform for sharing information. Once your blog starts attracting visitors, there are several ways to generate income. Many successful bloggers combine multiple monetization methods instead of relying on a single source.
- Google AdSense
Google AdSense is one of the most common ways to monetize a blog. After your website starts receiving traffic and meets AdSense requirements, you can display ads and earn revenue when visitors view or click them.
- Affiliate Marketing
Affiliate marketing allows you to earn commissions by recommending products or services. When readers purchase through your referral links, you receive a percentage of the sale.
Popular affiliate categories include:
- Web Hosting
- Software Tools
- Online Courses
- Blogging Resources
- AI Tools
- Sponsored Posts
As your audience grows, brands may pay you to publish sponsored articles, product reviews, or promotional content. Blogs with a loyal and engaged audience often attract better sponsorship opportunities.
- Freelance Services
Your blog can showcase your expertise and help attract clients.
You can offer services such as:
- Content Writing
- SEO Services
- Website Development
- Graphic Design
- Digital Marketing
Many bloggers earn their first clients directly through their websites.
- Digital Products
Creating and selling digital products can become a valuable income source because you create them once and sell them multiple times.
Examples include:
- eBooks
- Templates
- Checklists
- Guides
- Digital Downloads
- Online Courses
If you have knowledge or experience in a specific field, you can create online courses and sell them through your blog.
Popular course topics include:
- Blogging
- SEO
- Digital Marketing
- Finance
- Technology
- YouTube and Blogging Together
Combining YouTube with blogging can help you reach a larger audience and create multiple income streams. A blog can bring search traffic, while YouTube can help build a stronger personal brand and community.
Benefits include:
- More Audience Reach
- Additional Advertising Revenue
- Better Brand Authority
- More Affiliate Sales
Many successful content creators use both platforms together to maximize growth and income opportunities.
FAQs
How Much Does It Cost to Start a Kannada Blog?
The cost of starting a Kannada blog depends on the hosting plan you choose. With YouStable WordPress Hosting, beginners can start with plans from approximately ₹59 per month. Higher plans are available for growing websites that require additional resources and features.
Current pricing includes:
- DaStart – ₹59/month
- DaProfessional – ₹119/month
- DaElite – ₹219/month
Eligible annual plans may also include a free domain for the first year, which can help reduce the overall setup cost.
Can I Start a Kannada Blog Without Technical Knowledge?
Yes. Modern blogging platforms such as WordPress make it easy for beginners to create and manage a website without coding knowledge. Most hosting providers offer one-click WordPress installation, allowing you to set up a blog within a few minutes.
What Is the Best Niche for a Kannada Blog?
There is no single best niche for everyone. The ideal niche should match your interests, knowledge, and audience demand. Popular Kannada blogging niches include:
- Technology
- Education
- Finance
- Health
- Jobs and Careers
- Travel
- Food and Recipes
- Local Karnataka Topics
How Long Does It Take for a Kannada Blog to Get Traffic?
Blogging is a long term process, and results vary depending on content quality, competition, SEO, and publishing consistency. Many blogs begin seeing initial organic traffic within a few months, while significant growth often takes six to twelve months of consistent effort.
Conclusion
Starting a Kannada blog is no longer as difficult as many beginners think. With the right niche, a domain name, reliable hosting, WordPress, and a clear content strategy, you can create a website that serves readers and grows steadily over time.
The biggest advantage of Kannada blogging is that the demand for quality regional language content continues to increase across topics such as technology, education, jobs, finance, health, and business. Bloggers who focus on publishing useful and trustworthy information still have significant opportunities to build an audience and establish authority.
Rather than focusing on quick results, focus on creating helpful content, understanding your readers, and staying consistent. Every successful blog starts with a single article, and the effort you put in today can help you build a valuable online presence for years to come.